Kdenlive is a free and open-source non-linear video editor that is primarily aimed at the Linux platform, but also runs on Windows, macOS, and BSD. The name Kdenlive is an acronym for KDE Non-Linear Video Editor. It processes all video operations using the MLT Framework and is based on powerful FFmpeg libraries, allowing it to use almost any audio and video formats directly without conversion.
Kdenlive Features
Kdenlive offers a wide array of features for video editing, suitable for both beginners and professional users, though it has areas for improvement.
- Multi-Track Video Editing It supports an unlimited number of video and audio tracks that can be hidden, muted, adjusted in height, and named for complex projects. It also allows splitting audio and video from a clip into multiple tracks.
- Format Compatibility Kdenlive can use almost any audio and video formats, as it’s based on FFmpeg libraries. It supports various resolutions (DV, HD, UHD/4K) and frame rates (15fps to 60fps or higher), adapting source file resolution to the project resolution and duplicating/removing frames as needed. It also supports a wide range of image import formats including PNG, JPEG, TIFF, SVG, and newer formats like AVIF and JPEG XL.
- Editing Techniques
- 3-Point Editing Kdenlive supports this industry-standard technique, allowing users to define in and out points for a clip in the clip monitor and an in point in the designated track.
- Multi-Cam Editing You can play multiple camera angles or footage types simultaneously in the project monitor and select which source is added to the timeline, which speeds up the editing process.
- Customizable Interface Users can select, resize, position, and group widgets to suit their workflow. It comes with default layouts for logging, editing, color grading, and audio editing, and keyboard shortcuts can be customized. Limited themeing is also available, supporting dark themes.
- Title Editor & Animation Integration
- Built-in 2D Title Editor Kdenlive has a 2D Title Editor for creating text, from simple callouts to scrolling credits. It uses system fonts, allows line and character spacing, and includes standard text formatting, coloring, spatial distribution, and alignment features. It has limited animation functionality for scrolling in any direction and a typewriter effect.
- Glaxnimate Integration It integrates with Glaxnimate for vector graphics (SVG) to create various animations like route displays, infographics, or call-outs.
- Effects and Filters
- Wide Range of Effects Dozens of video and audio effects are available, ranging from artistic, stylish, blur, sharpen, color correction, to audio adjustments and standard transformation functions. Effects are supplied by MLT Framework, avfilter, frei0r, and ladspa.
- Keyframeable Effects Most effects can be keyframed, allowing parameters to change over time with different keyframe types (linear, discrete, smooth curves).
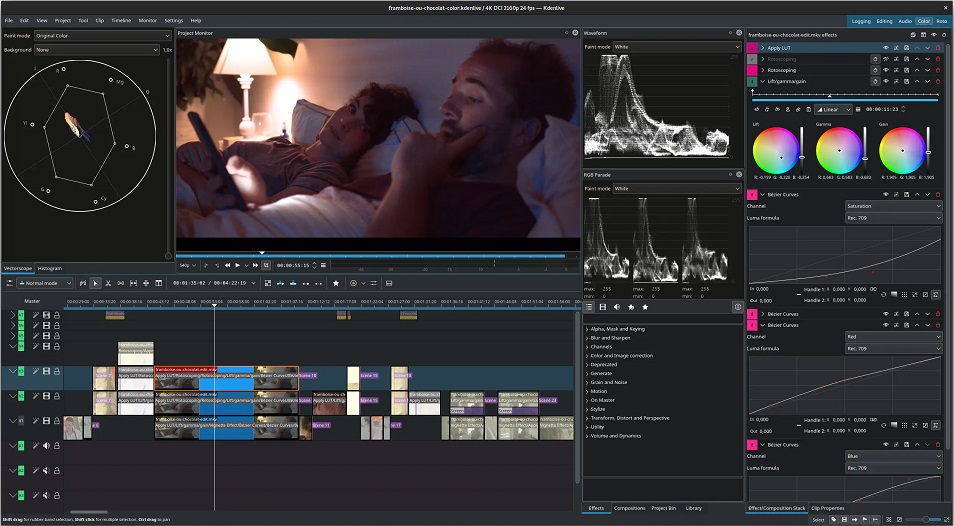
- Audio and Video Scopes Powerful analysis tools are available to monitor audio levels and check color grading, including Audio Meter, Histogram, Waveform, Vectorscope, and RGB Parade.
- Proxy Editing Kdenlive can automatically create low-resolution copies of source clips for smoother editing performance, even on lower-end systems, with the final render using full resolution. This can help reduce preview lag on less powerful machines.
- Automatic Backup Project files are automatically backed up every few minutes, and older versions are kept for rollback.
- Automatic Subtitle Generation Using Large Language Models (LLMs) like VOSK and Whisper, Kdenlive can generate subtitles directly from video sources and translate them into different languages. It supports .rst and .ass subtitle file formats.
- Online Resources Kdenlive provides direct online access to the KDE Store for user-generated content (keyboard layouts, effects, title templates, projects) and allows downloading clips from Pexels, Pixabay, Freesound, and the Internet Movie Archive.
- Timeline Preview Render For hi-res footage or complex effects, parts of the timeline can be rendered for smooth playback.
- Other Features It also includes non-blocking rendering, simple tools for creating color, text, and image clips, automatic clip creation from picture directories with crossfade transitions, and a themable interface. Motion tracking and color grading are available.
Kdenlive Price
Kdenlive is a completely free and open-source program. It does not have any hidden fees or add watermarks to output media.
How to Use Kdenlive (Basic Workflow)
Here’s a basic workflow for editing a video in Kdenlive:
- Set Project Parameters: Before importing, define your project settings (e.g., 720p, 4K, 1080p, frame rate like 30fps) by going to
Project>Project Settings. You can also create custom profiles. It’s recommended to match the aspect ratio, resolution, and frames per second to your recording to avoid quality issues. - Import Assets: Drag and drop your media files (videos, audio, images) into the Project Bin. If Kdenlive identifies media different from your project profile, it may offer to change the profile, which you can cancel if you prefer to stick with your chosen settings.
- Monitor Your Clips:
- The Clip Monitor shows a preview of the selected clip from your Project Bin. You can scrub through the footage, set “Zone in” (shortcut
I) and “Zone out” (shortcutO) points to select specific segments. You can also import only video (film strip icon) or only audio (speaker icon) to the timeline. - The Project Monitor displays a preview of what’s currently on your timeline.
- The Clip Monitor shows a preview of the selected clip from your Project Bin. You can scrub through the footage, set “Zone in” (shortcut
- Add Clips to Timeline: Drag your selected clips or segments from the Project Bin or Clip Monitor onto the timeline, which consists of video (V1, V2, etc.) and audio (A1, A2, etc.) tracks. Clips on higher tracks appear above lower ones. It’s suggested to start with a good number of video and audio tracks (e.g., eight each) to avoid adding them as you go.
- Trim and Cut:
- Trimming: Left-click and drag the edges of a clip on the timeline to crop its beginning or end. The cropped parts are not deleted and can be re-extended.
- Cutting (Razor Tool): Use the razor tool to split clips at the playhead’s position. You can also right-click on a clip and select “Cut clip”.
- Ungroup/Group Clips: By default, video and audio tracks from the same clip are linked. To move them independently, right-click on the clip and select “Ungroup Clips” (Ctrl+Shift+G). To re-synchronize, select both and “Group Clips”.
- Add Fades and Transitions:
- Fades: For video, click the upper right corner of a clip and drag to add a fade out (e.g., fade to black). For audio, drag from the upper left corner to add a fade in. You can control the duration and animation type (e.g., cubic).
- Transitions: Drag a clip over another on the timeline, or use the “Mix clips” (U) option above the timeline. You can adjust softness and method (e.g., curtain, dissolve) for compositions.
- Add Titles and Animate: Create title clips using the built-in title editor. Drag them onto a dedicated title track. You can animate titles by applying a “Transform” effect and using keyframes to change parameters like position over time.
- Use Spacer Tool: To move multiple clips together and close gaps, use the spacer tool. If a soundtrack prevents movement, you can temporarily lock it.
- Adjust Audio: Add a “Volume (keyframeable)” effect to control audio levels over time. You can also right-click an audio track and “Separate channels” to view the waveform, useful for precise editing.
- Color Grading: Basic color adjustments can be made with effects like “Lift/Gamma/Gain”. For more detailed work, you can switch to the “Color” workspace.
- Create Sequences: For better organization or to apply effects to a group of clips, select them, right-click, and choose “Create Sequence from selection”.
- Change Clip Speed: Right-click on a clip and select “Change Speed,” or hold
Ctrland drag the end of the clip on the timeline to adjust speed. - Export: Go to
Project>Render. Choose your desired profile (e.g., generic HD for web MP4 H.264 AAC). You can also enable parallel processing for faster rendering, though it may cause artifacts. Kdenlive allows you to continue editing while rendering.
Kdenlive Pros and Cons (Review)
Pros
- Ease of Use Many users find Kdenlive much less complicated and easier to use than DaVinci Resolve. It has an intuitive UI and a well-distributed interface.
- Feature-Rich Despite being free, it offers a “ton of features” and is considered “professional enough for most people”.
- Efficient for Montage It provides tools like trim, cut, rotate, split, screen split, and merge, making it efficient for montage videos.
- Subtitle Support Kdenlive allows creation of 2D subtitles with customizable properties, design features (color, outlines, gradients), and animation via keyframes. It supports system fonts and Kdenlive font templates.
- Advanced Effects It supports rotoscoping for selective color correction and a plethora of other effects for video, audio, and images, many of which are keyframeable.
- Community Kdenlive has a great community.
Cons
- Stability Issues (Crashes) Kdenlive has been reported to crash frequently, especially on Windows, or when dealing with complex projects, high-resolution footage, or certain hardware combinations. Some users report it crashing multiple times during an editing session. While backups exist, frequent crashes can be annoying and disrupt workflow.
- User Experience Varies: Crash frequency depends heavily on the user’s operating system, hardware (CPU, GPU, RAM), Kdenlive version, and the complexity/type of project being edited. Some Linux users report rare or no crashes, while Windows users often experience more instability. The small Kdenlive development team (5-6 people, with only 2 hardcore coders) has limited resources.
- Slow Response / No GPU Acceleration Kdenlive does not enable GPU acceleration or multi-core parallel image processing for timeline playback. This means it relies heavily on CPU power, leading to potential lag, chop, or crashes on lower-end systems, and high CPU/RAM usage even on powerful machines. More and better GPU support is on the near-term roadmap.
- Limited Speed Effect Control The speed adjustment methods can be imprecise or buggy, making it hard to achieve exact speed values.
- Default Auto-Split Audio/Video While offering a flexible workflow, the default auto-split of audio and video into linked tracks can be less friendly for beginners new to non-linear editing (NLE) apps.
- Hidden Effects Some effects (e.g., LUT and curve) are not activated by default, which can be confusing for new users.
- Limited Output Options Some users find the output options extremely limited, with popular formats like MKV, MOV, and AVI not directly supported for output, and a lack of ready-made formats for devices or social media. However, other sources indicate Kdenlive can export to most formats supported by FFmpeg, including MP4 (H.264/HEVC), MPEG-2, and Apple ProRes 422. There might be a discrepancy or specific context to the “limited output options” claim.
- High GPU Requirement (for upscaling) While the source states Kdenlive has high GPU requirements for better performance, it also mentions it doesn’t support GPU acceleration for timeline playback. This might be a contradiction or refer to specific rendering profiles that do utilize GPU. The general consensus is that Kdenlive is CPU-bound.
- Learning Curve Although intuitive for basic editing, it can have a “steep learning curve” for complex processing, especially for features like manual upscaling.
AI Alternatives
While Kdenlive is a traditional video editor with some built-in AI-supported features like automatic subtitle generation, the market for AI video generators is rapidly expanding. These alternatives often fall into three categories: video editors with AI editing tools, generative apps, and video productivity apps.
- Picwand AI Video Upscaler: This is presented as a superior AI-driven alternative specifically for video upscaling. Unlike Kdenlive’s manual upscaling process, Picwand leverages machine learning for one-click operation, automatically enhancing resolution, reconstructing details, reducing noise, and balancing brightness and restoring texture. It requires no learning curve and offers fast rendering without high GPU requirements.
- Video Editors with AI Editing Tools: These tools are meant to speed up the editing process.
- Descript: Excellent for editing video by editing the transcript, saving significant time by automatically removing filler words and silences. It also offers AI tools for audio refinement and auto multicam.
- Wondershare Filmora: A long-standing video editor that integrates many AI features for polishing videos, such as AI smart cutout, audio denoise, audio stretch, motion tracking (for blurring faces), background removal, and audio-to-video conversion.
- Canva Video Editor: A built-in editor better suited for social media-ready videos, which integrates with Runway’s generative AI models.
- Kapwing: Offers a wide range of features, including editing video by editing the script and a video generator that assembles stock footage based on your script.
- Generative AI Apps: These take prompts (text, audio, image, video) and generate video output.
- Sora (OpenAI): Generates “amazing videos from simple prompts”. It excels at imaginative scenes from text-to-video, can create storyboards, and remix existing creations. While advanced, it still struggles with object permanence, interactions, and dynamic human/animal movements.
- Runway: Offers “generative AI video with advanced tools”. It allows for high-fidelity video generation, with features like Gen-3 Alpha, and “Act One” to animate characters from real-world actor performances. It also has many other AI-powered tools for background removal, slow motion, and subtitles.
- Vyond: Specializes in creating animated character videos from prompts, useful for training videos or conveying actions.
- revid.ai: Provides a variety of AI-powered templates for repurposing content (long videos to shorts, articles to video) and generating cinematic styles or AI talking avatars.
- LTX Studio: Offers “extreme creative control” over short, narrative films. It guides users through detailed production processes, allowing scene breakdowns and character action/look adjustments.
- Other Generative Tools: Pika, Luma Dream Machine, PixVerse, Hailuo, and Genmo are other emerging AI video generators, many offering free trials.
- Video Productivity Apps: Use AI to create content faster for multiple marketing channels or platforms.
- Capsule: Simplifies video production workflows by helping businesses create and apply design systems, and adding dynamic visual elements and branded calls to action. It can auto-cut gaps and suggest soundtracks.
- invideo AI: Creates near-ready-to-publish social media videos from a single prompt, by generating scripts, searching stock media, and assembling clips with AI voiceovers, text overlays, music, and transitions. It also allows editing with text prompts (e.g., “add subtitles”).
- Peech: Designed for content marketing teams to repurpose content efficiently by applying brand kits, customizable subtitles, and removing awkward silences and filler words. It allows quick addition of intros, outros, and music.
- Synthesia: Best for using digital avatars to create training videos or other content where human actors are not feasible. It offers high-quality AI avatars with multi-language support, capable of convincing lip and body movements.
In essence, Kdenlive is like a reliable Swiss Army knife – it’s open, versatile, and packed with many essential tools for video editing. It’s a fantastic free option that empowers you to tackle diverse tasks, much like a handyman who can build a shed or fix a leaky faucet. However, when it comes to highly specialized tasks like perfectly upscaling a low-resolution clip or rapidly generating a complex scene from a simple idea, Kdenlive might require more manual effort, while dedicated AI alternatives are akin to specialized power tools, designed to perform those specific functions with impressive speed and precision.
 Facebook
 LinkedIn
 X
X
 Reddit